(1) About Manual Typesetting
I have worked as a graphic designer for over ten years, but before then, I was a freelancer specializing in “manual typesetting”.
Once type of printing was made not with PCs but with “manual typesetting.”
Typesetting is a system to make photographic papers that can be utilized as a mechanical system for printing by creating a “word board” whose glass plates sandwich the master film, which is then exposed to light, releasing a shutter based on the principle of photography and printing a photograph on the photographic paper set in a camera obscura. The size of a letters and the style, such as narrow and italic, can be controlled by changing lenses.
The procedure is difficult to explain in words, but in short, the work is done by sitting on a chair in front of a machine as shown in Photo 1 and typing letters on a “word board” as a manuscript.
Please see the photos of the machine on the right, though the conditions of the photography are not as good as possible.
This manual typesetting machine may appear as if it is function-rich to people unfamiliar with it, because there are so many keys.
But there is a decisive difference between this machine and digital devices we use daily, such as PCs.
This is because this machine has no functions like “Command (Control) and Z”, “Delete”, “Save As” and “Save Copy”. We cannot “cancel” letters typed with this machine, because it prints a photograph on the photographic paper based on the principle of photography as previously explained.
If you type a wrong letter, you have to correct it by developing and drying a photographic paper again and attaching the correct letter. This demands tools such as cutter knife and paper cement. Even for corrections after proofreading required for any printing material normally, you must do it manually by cutting and attaching the correct letter.
“Good typesetting operators” at the time this system was widely in used were those who were “free from errors and work quickly.” I particularly cared about “being free from errors,” because I had failed to attain it fully. This was a goal I had always attempted to attain, but not a single day passed without making several errors.
As you may know by seeing the photo of a word board full of tiny letters on the right, it’s quite easy to miss your aim and choose a letter next to the correct one. In addition to the selection of a letter itself, a mistake was also likely to occur when selecting the position, size, or typeface of a letter.
In these conditions, it is natural for a normal person to make a mistake. However, there used to be operators that could continue the work for many days without any mistakes. They were unbelievable people with consummate skills.
If you want to be called “a skillful typesetting operator,” you can work quickly without mistakes at least and then make “beautiful type composition.”
However, the “beauty” of type composition is slightly different depending on the client (e.g. a designer and printing company) because their preference and philosophy are different.
At that time, “Tsumegumi,” a technique to narrow gaps between Japanese characters, was favored in general for books, while “Tsumeuchi,” also a technique to narrow gaps between characters but was used a bit more loosely and easily than Tsumegumi.
Operators were also required to have a good sense in setting types, considering the intended use of the type composition or the design of the article. This means that the type setting is different depending on the substance of the work.
Thus, manual typesetting and computer typesetting were mainly used for printed matters until the early 1990s.
As one of these manual typesetters, I confidently believed that “improving technique” was the most important aspect of this job. I think that the same goes for not only typesetting craftsmen, but also for any industry. This is the concept of developing strong skills for the future. In addition to this, as of 2010, I also believe that “I should not adhere to a single technique quite so much.”
Manual typesetting was eventually replaced with DTP. If I look back now, it was hardly possible that the kind of primitive work to make the master copy for printing by cutting paper with a box cutter and sticking it with paste survived into the 21st century. However, it is hard to realize this kind of change without having experienced it as reality.
I started using the Macintosh computer (Mac) around 1995 and was engaged in DTP work in parallel with typesetting. I then gradually switched the work of typesetting to graphic design, and I have worked almost fully as a graphic designer since 1999.
I initially planned to include a general description of manual typesetting in this site as a record. However I have since noticed it is possible to read objective and general records of manual typesetting through other sites (including. “Ryougetsu Manufactory,” a typesetting fan site)
Therefore, I decided to introduce the images of unique photographic paper of types I have set with the explanation.
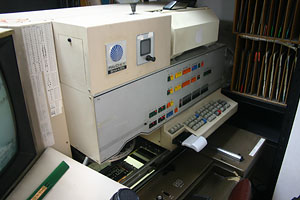

[1] Photocomposer PAVO-KY,
made by the Shaken Corp.
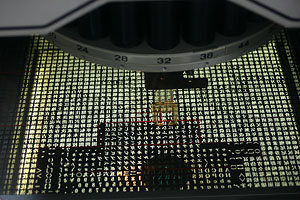
[2] Word board on main plate, Shuei-Mincho (SHM)